Flaky, buttery Cream Cheese Danish are so easy to make with the help of frozen puff pastry sheets! You don’t need to be a trained pastry chef to make these homemade Danish pastries that are perfect for breakfast, brunch, or an afternoon snack.

Seven simple ingredients and a little bit of time are all you need to make Cheese Danish just like you’ve had at your favorite bakery or brunch spot! Pull some puff pastry out of the freezer and get ready to impress yourself and your friends with these simple, delicious baked sweets.
Why You’ll Love This Recipe
- Delicious Cheese Filling – The sweetened cream cheese in these danishes tastes just like cheesecake! A bit of vanilla and fresh lemon play wonderfully with the slight tang of the cheese.
- No Fancy Ingredients – You may be new to baking with puff pastry sheets, but I bet you’ve used all of these other ingredients before. You can make cheese Danish any time!
- Versatile Recipe – Pastries like Danish are a classic part of a continental breakfast, but you can also enjoy them as an after-dinner dessert, or an afternoon pick-me-up with a cup of coffee or tea. If you want to learn to make the best cup of coffee, read all about how to use a French Press!
Ingredients In Homemade Cheese Danish
Here’s what you need to make these easy cheese danish at home:
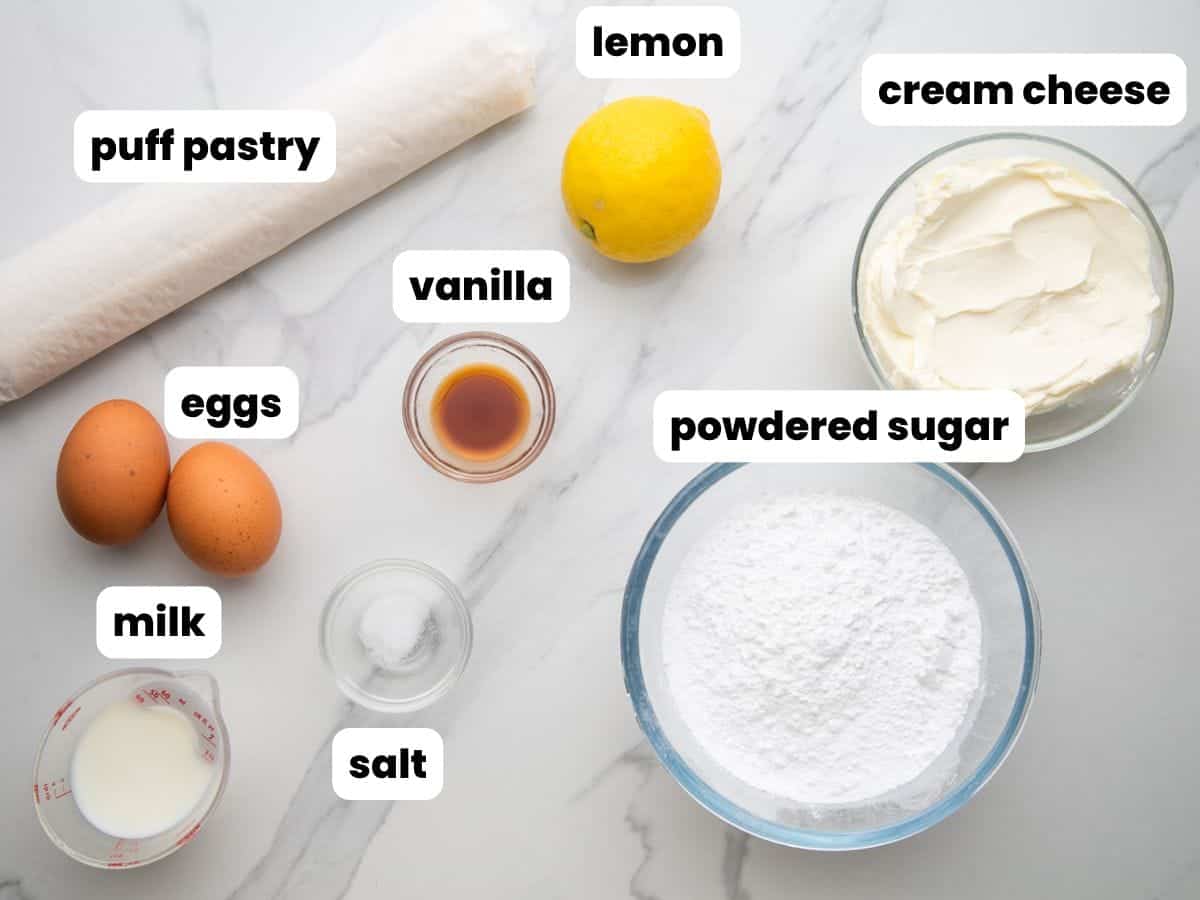
- Puff Pastry: Making puff pastry from scratch is a long, labor-intensive process, and I think that frozen pastry sheets are just as good! You can find them near the other desserts in the freezer section. Allow it to thaw according to the package directions before starting.
- Cream Cheese: The main ingredient in our sweet, creamy pastry filling. Avoid using low-fat cream cheese for baking; it just doesn’t taste as good.
- Eggs- You’ll need 1 egg to make an egg wash for the pastry, and 1 egg yolk to add to the filling.
Complete list of ingredients and amounts can be found in the recipe card below.
How To Make Cheese Danish
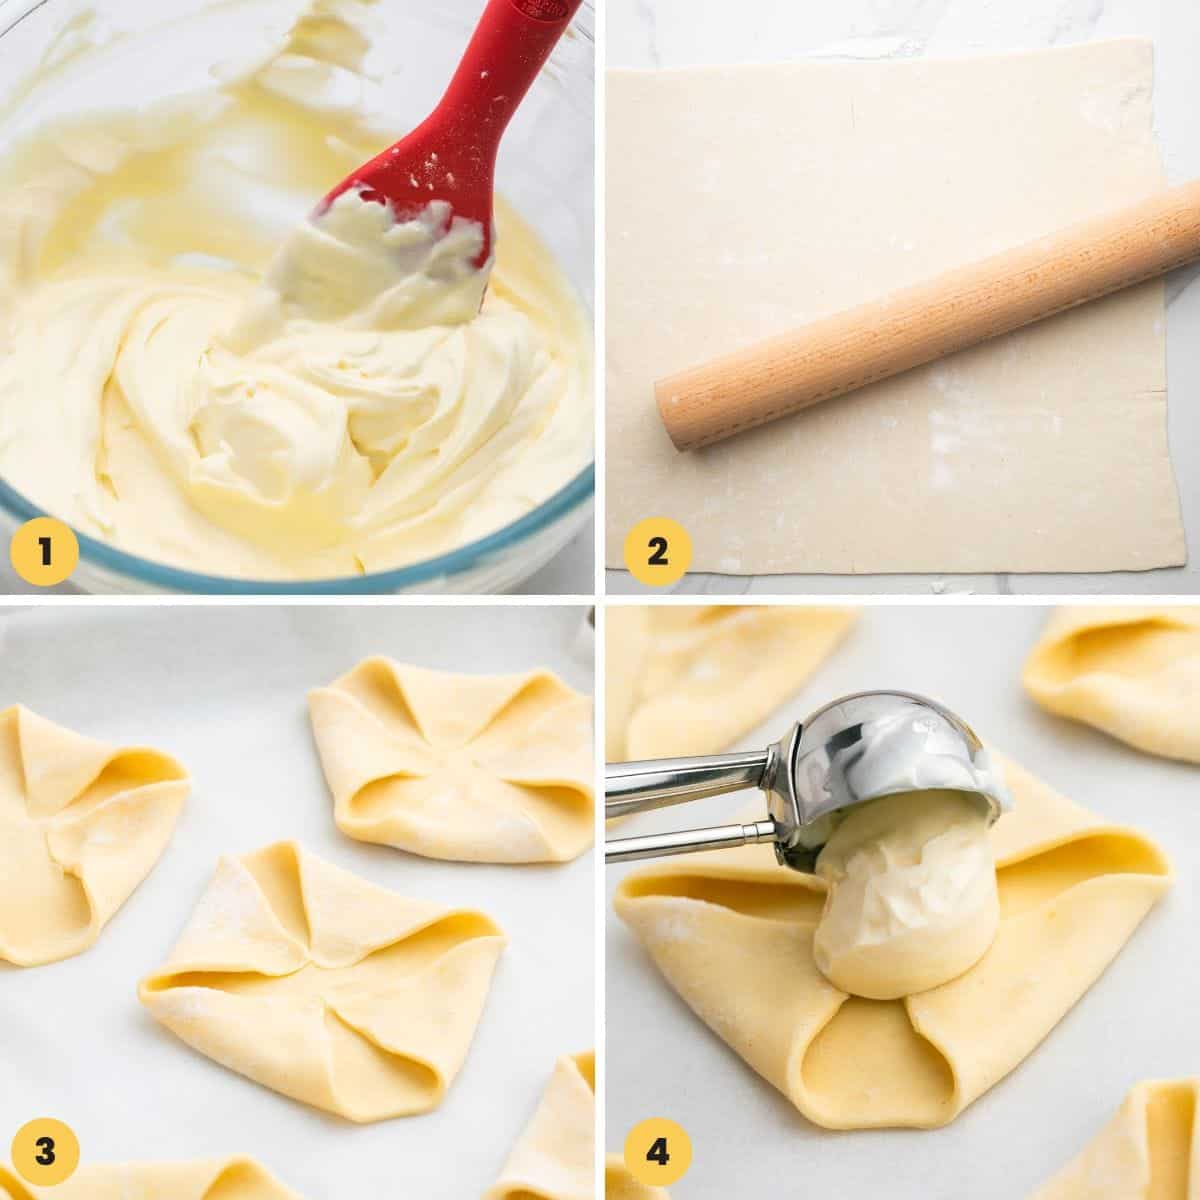
- Make the Cheesecake Filling: In a bowl, combine softened cream cheese with egg yolk, powdered sugar, lemon juice, vanilla, and salt. Use a whisk or rubber spatula to mix until smooth.
- Roll Out the Pastry Sheet: The thickness that the pastry sheets start at is a bit too thick for this application. Use a rolling pin to lightly roll the sheet out, just to smooth out the creases.
- Cut and Fold: Use a pastry cutter or a pizza cutter to cut the sheet into 3-4-inch squares. Add the squares to a parchment-lined baking sheet, then fold the corners of each square in towards the center and press gently to adhere.
- Add the Filling: With the help of a small cookie scoop, add a tablespoon of the cheesecake filling to the center of each puff pastry square.
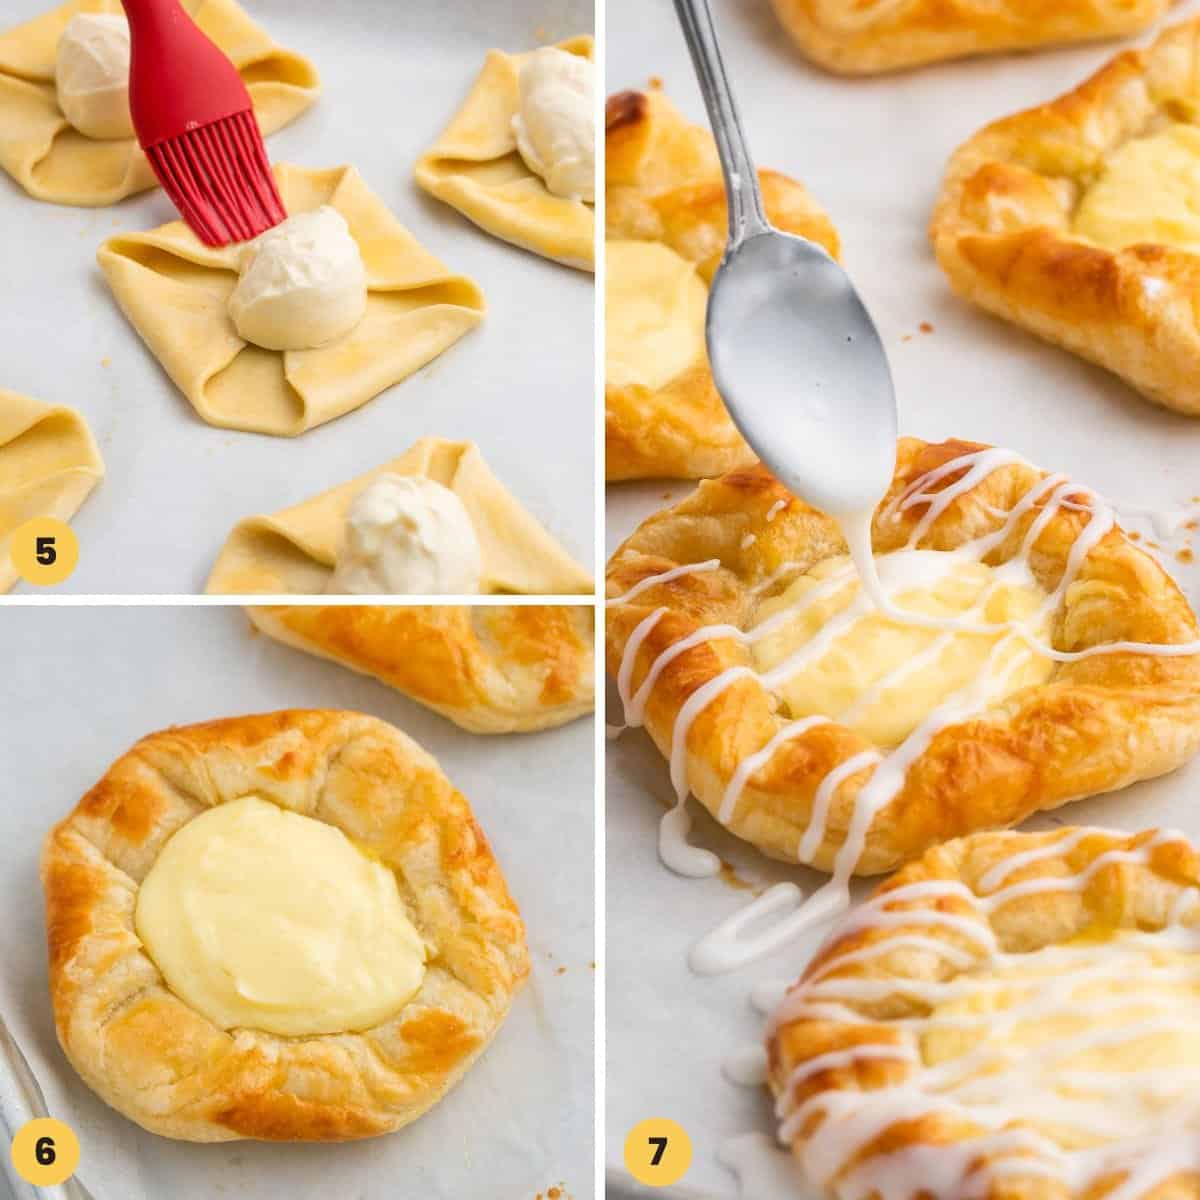
- Egg Wash: With a whisk, combine an egg with water, then use a pastry brush to brush the sides of each pastry around the filling with the egg wash.
- Bake: Bake in a preheated 350°F/180°C oven for 16-18 minutes, rotating the pan halfway through so that they bake evenly. The Danish are done when the dough is golden brown. Remove from the oven and allow the Danish to cool completely.
- Ice: When cool, mix 1 cup powdered sugar with milk to create a glaze. Add the milk slowly so that you don’t thin the icing down too much! Drizzle the icing over each pastry, and allow to set.
Tip!
Please make sure to let the danish cool completely before adding the icing! If they are even a little bit warm, the glaze will just soak in and disappear.
Recipe Tips
- It’s best to form and fill the Danish on the baking sheet. This way you won’t have to move them from the counter to the tray and risk wrinkling or tipping them over.
- You don’t need to fold the dough over the filling. As the pastry bakes, it will puff up and fill in the space around the cream cheese.
- Depending on where you live or what brand you use, your frozen puff pastry sheet may be a slightly different starting size. Just be sure to lightly roll the sheet so that the lines are smoothed, and cut it into relatively similar-sized squares.
- Add Extras! Try topping the pastries with chocolate chips or fresh berries before baking.
- Adjust the consistency of your glaze by adding more milk to thin it out or more sugar to thicken it. You want it to be easily drizzled from a spoon.

Storing Tips
Store cream cheese Danish pastries in the refrigerator for up to 4 days, or freeze for longer storage, Danish can be frozen for up to 3 months if wrapped really well.
Because of the cream cheese filling, you should not store these at room temperature.
What To Serve With Cheese Danish
Make these easy cheesecake pastries part of a big breakfast or brunch spread! Here are some of my favorite breakfast recipes:
- Scrambled Eggs with Cottage Cheese
- Mixed Berry Smoothies
- Shakshuka (eggs poached with tomatoes)
- Bisquick Breakfast Casserole
Cheese Danish also makes a perfect sweet snack, along with a cup of tea or a refreshing glass of homemade orangeade.
Recipe FAQs
These do come in different sizes, depending on the brand. Roll each sheet lightly and cut it into squares that are about 4 inches. You can trim away any extra, or piece together the edges to make another slightly less perfect Danish.
Absolutely! Try this recipe with any type of pie filling, preserves or jam, or pieces of dark chocolate as the filling.
Look in the freezer section near the other frozen desserts! It comes rolled or folded and is super easy to use. Be sure to keep it frozen until you need it, and thaw it out per the instructions on the package.
These easy homemade cheese Danish are going to be a hit at your next brunch party! Pick up some puff pastry and make these ASAP! Or, save the recipe by pinning it for later.
Did you make this? Be sure to leave a review below and tag me on Facebook, Instagram, or Pinterest!

Cheese Danish
Equipment
- Pizza Cutter
Ingredients
- 1 17.3oz OR 320g box puff pastry thawed
- 1 egg + 2 teaspoons of water for egg wash
For the Filling
- 8 ounces (225 grams) cream cheese softened
- 1 egg yolk at room temperature
- ¼ cup (30 grams) powdered sugar
- 1 teaspoon fresh lemon juice
- 1 teaspoon pure vanilla extract
- ⅛ teaspoon salt
For the Glaze
- 1 cup powdered sugar
- 1-2 tablespoons milk
Instructions
- Preheat the oven to 350°F/180°C, 160°C fan oven, and line a large cookie sheet with parchment paper (I used a half-size sheet pan).
- To make the cheesecake filling, in a bowl combine cream cheese with yolk, powdered sugar, lemon juice, vanilla, and salt. Use a whisk or a rubber spatula.
- Using a rolling pin, roll out the puff pastry into a 12×12-inch square.
- Use a pizza cutter or a knife, cut the dough into 9 4-inch squares. Then fold each corner of each square about 1 inch towards and center and press gently to adhere.
- With the help of a small (1 tablespoon) cookie scoop, scoop a tablespoon of cream cheese filling into the center of each puff pastry square.
- Make the egg wash, in a small bowl whisk together an egg with water, then using a pastry brush, brush the sides of each pastry (everywhere around the filling).
- Bake in the preheated oven for 16-18 minutes rotating the pan halfway through. Remove from the oven, and allow to cool completely before adding the icing.
- To make the icing, in a bowl, combine the powdered sugar with milk and vanilla extract. Very slowly add the milk so you don’t end up with a thin icing. Drizzle over each pastry.
Notes:
- It’s best to form and fill the danish on the baking sheet. This way you won’t have to move them from the counter to the tray and risk wrinkling or tipping them over.
- Depending on where you live or what brand you use, your frozen puff pastry sheet may be a slightly different starting size. Just be sure to lightly roll the sheet so that the lines are smoothed, and cut it into relatively similar sized squares.
- Add Extras! Try topping the pastries with chocolate chips or fresh berries before baking.
- To Store: Keep these in an airtight container in the fridge for up to 4 days, or in the freezer for up to 3 months.
Nutrition Information
This website provides approximate nutrition information for convenience and as a courtesy only. Nutrition data is gathered primarily from the USDA Food Composition Database, whenever available, or otherwise other online calculators.
© Little Sunny Kitchen




Oralia Gonzalez says
love your recipes
Sarah says
So glad to see this recipe! I can’t find the kind of danish I want in the stores near me, but now I can make them!!!
Abby says
These were so good! Way better than I’ve ever bought. Will definitely make again.
Little Sunny Kitchen says
Thank you, Abby! I’m so glad you enjoyed this recipe!
Rae T says
All I can say is WOW! This was my first time making a danish and I was nervous. It was so easy!! And delicious!
Little Sunny Kitchen says
I’m so glad it turned out well for you, Rae! Thank you for the kind review
Sharina says
New favorite brunch! So delicious and irresistible! I love pairing it with scrambled eggs.
Little Sunny Kitchen says
I’m so happy this has become a favorite for you, Sharina! Thanks for the wonderful review