

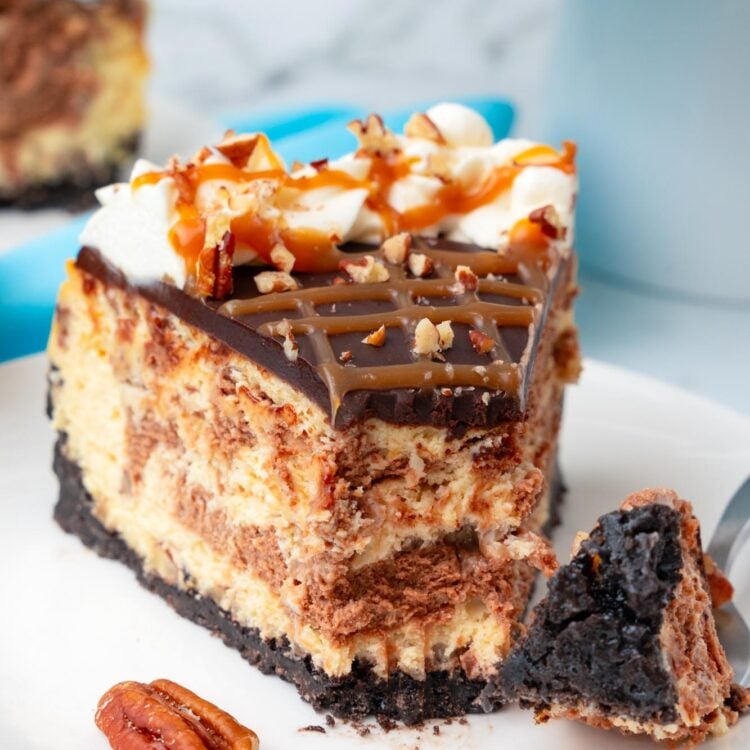
A Coffee Lover’s Dream Dessert!
As a coffee lover and someone who is rarely without a cup sitting in front of me, this cheesecake is my absolute dream!
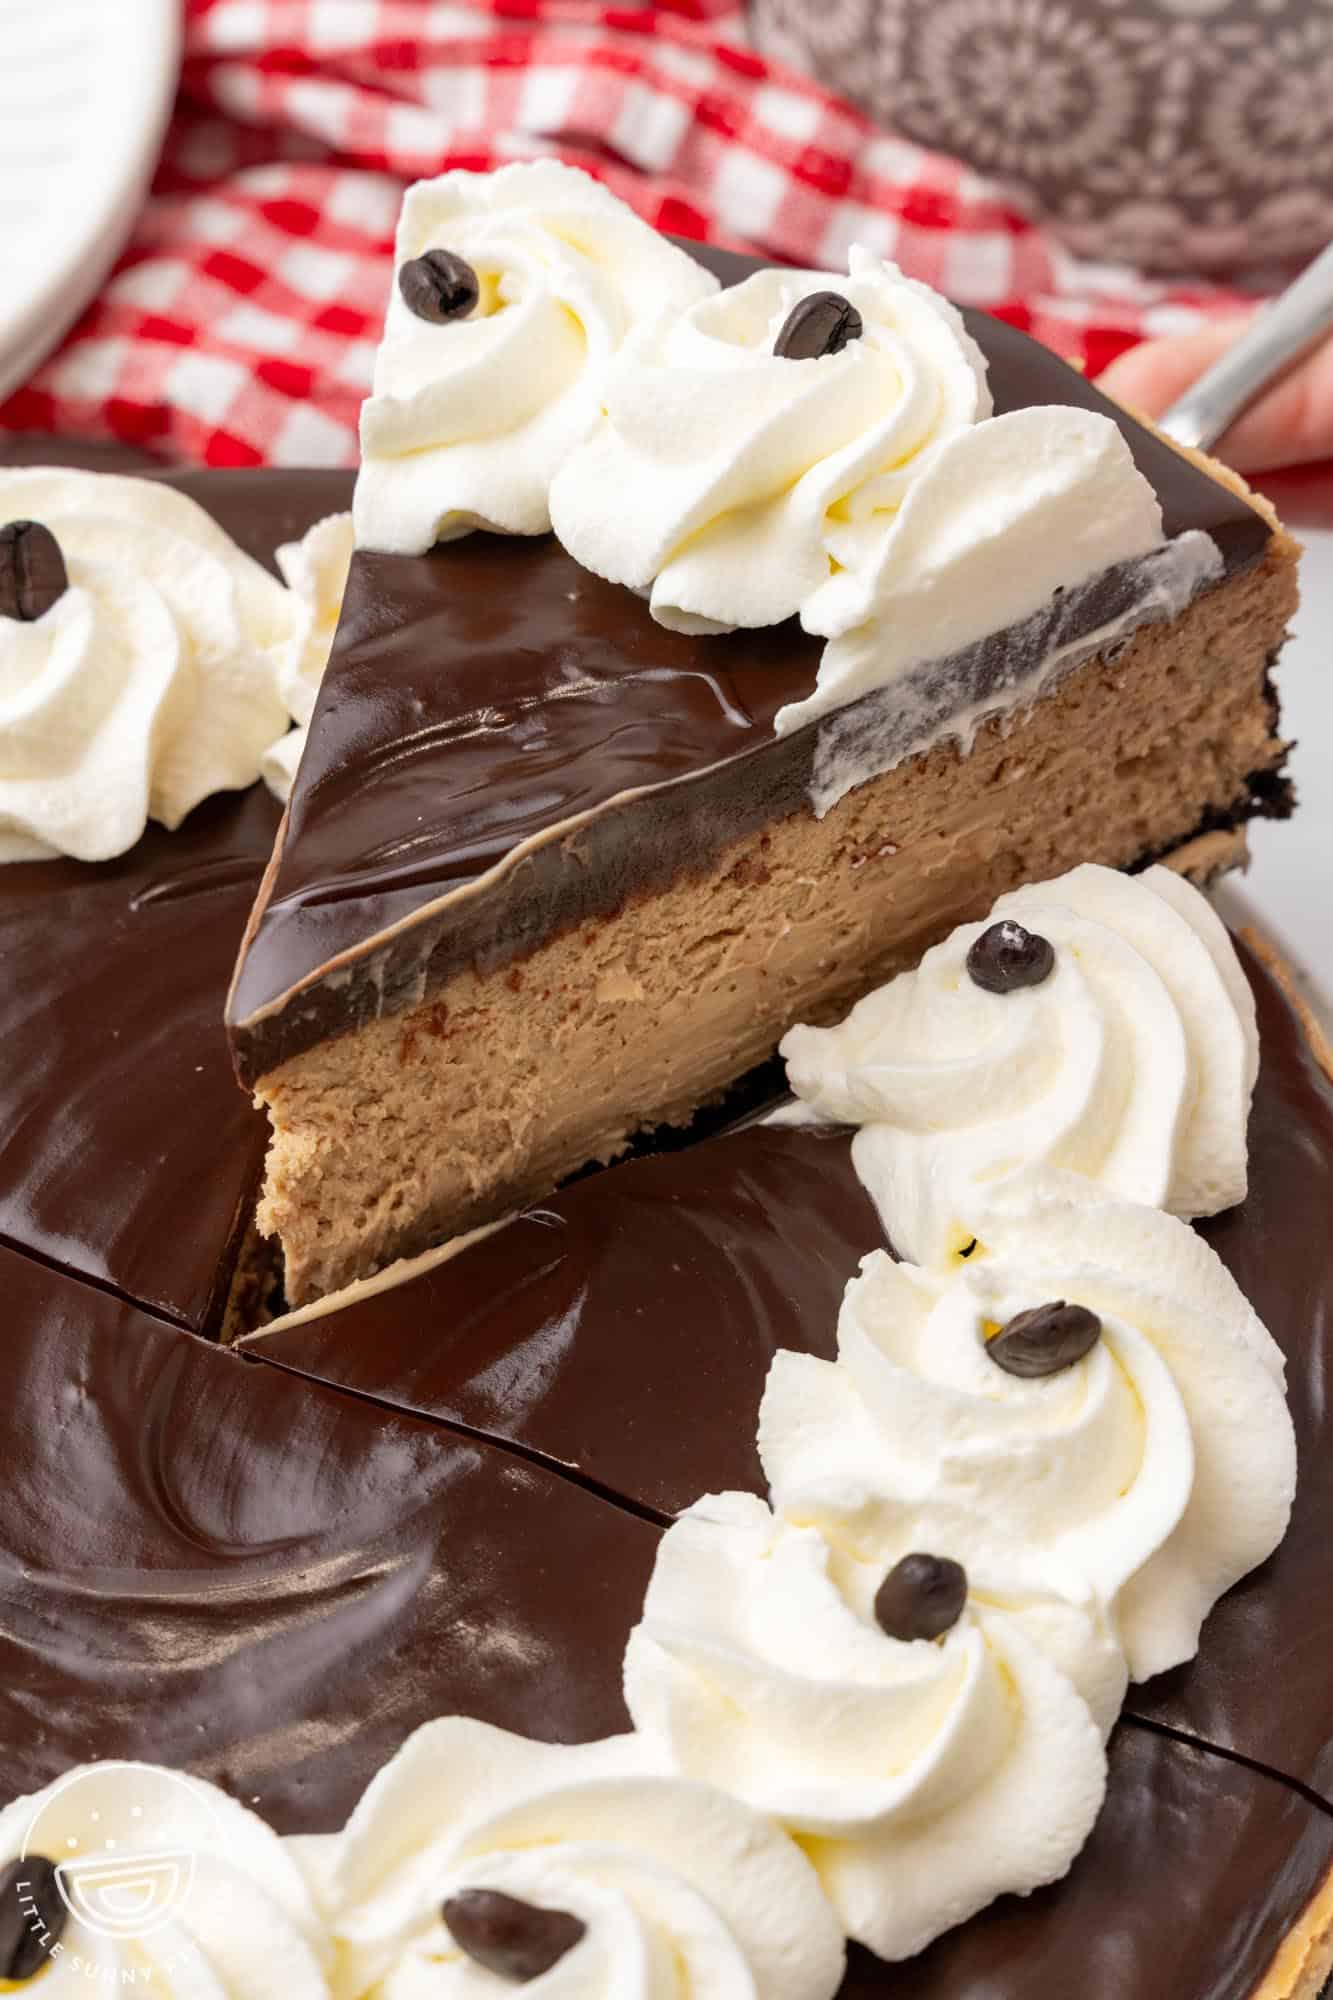
Like all of my other baked cheesecake recipes, it’s rich, creamy, sweet, and indulgent. This one is flavored with espresso powder to make it totally amazing.
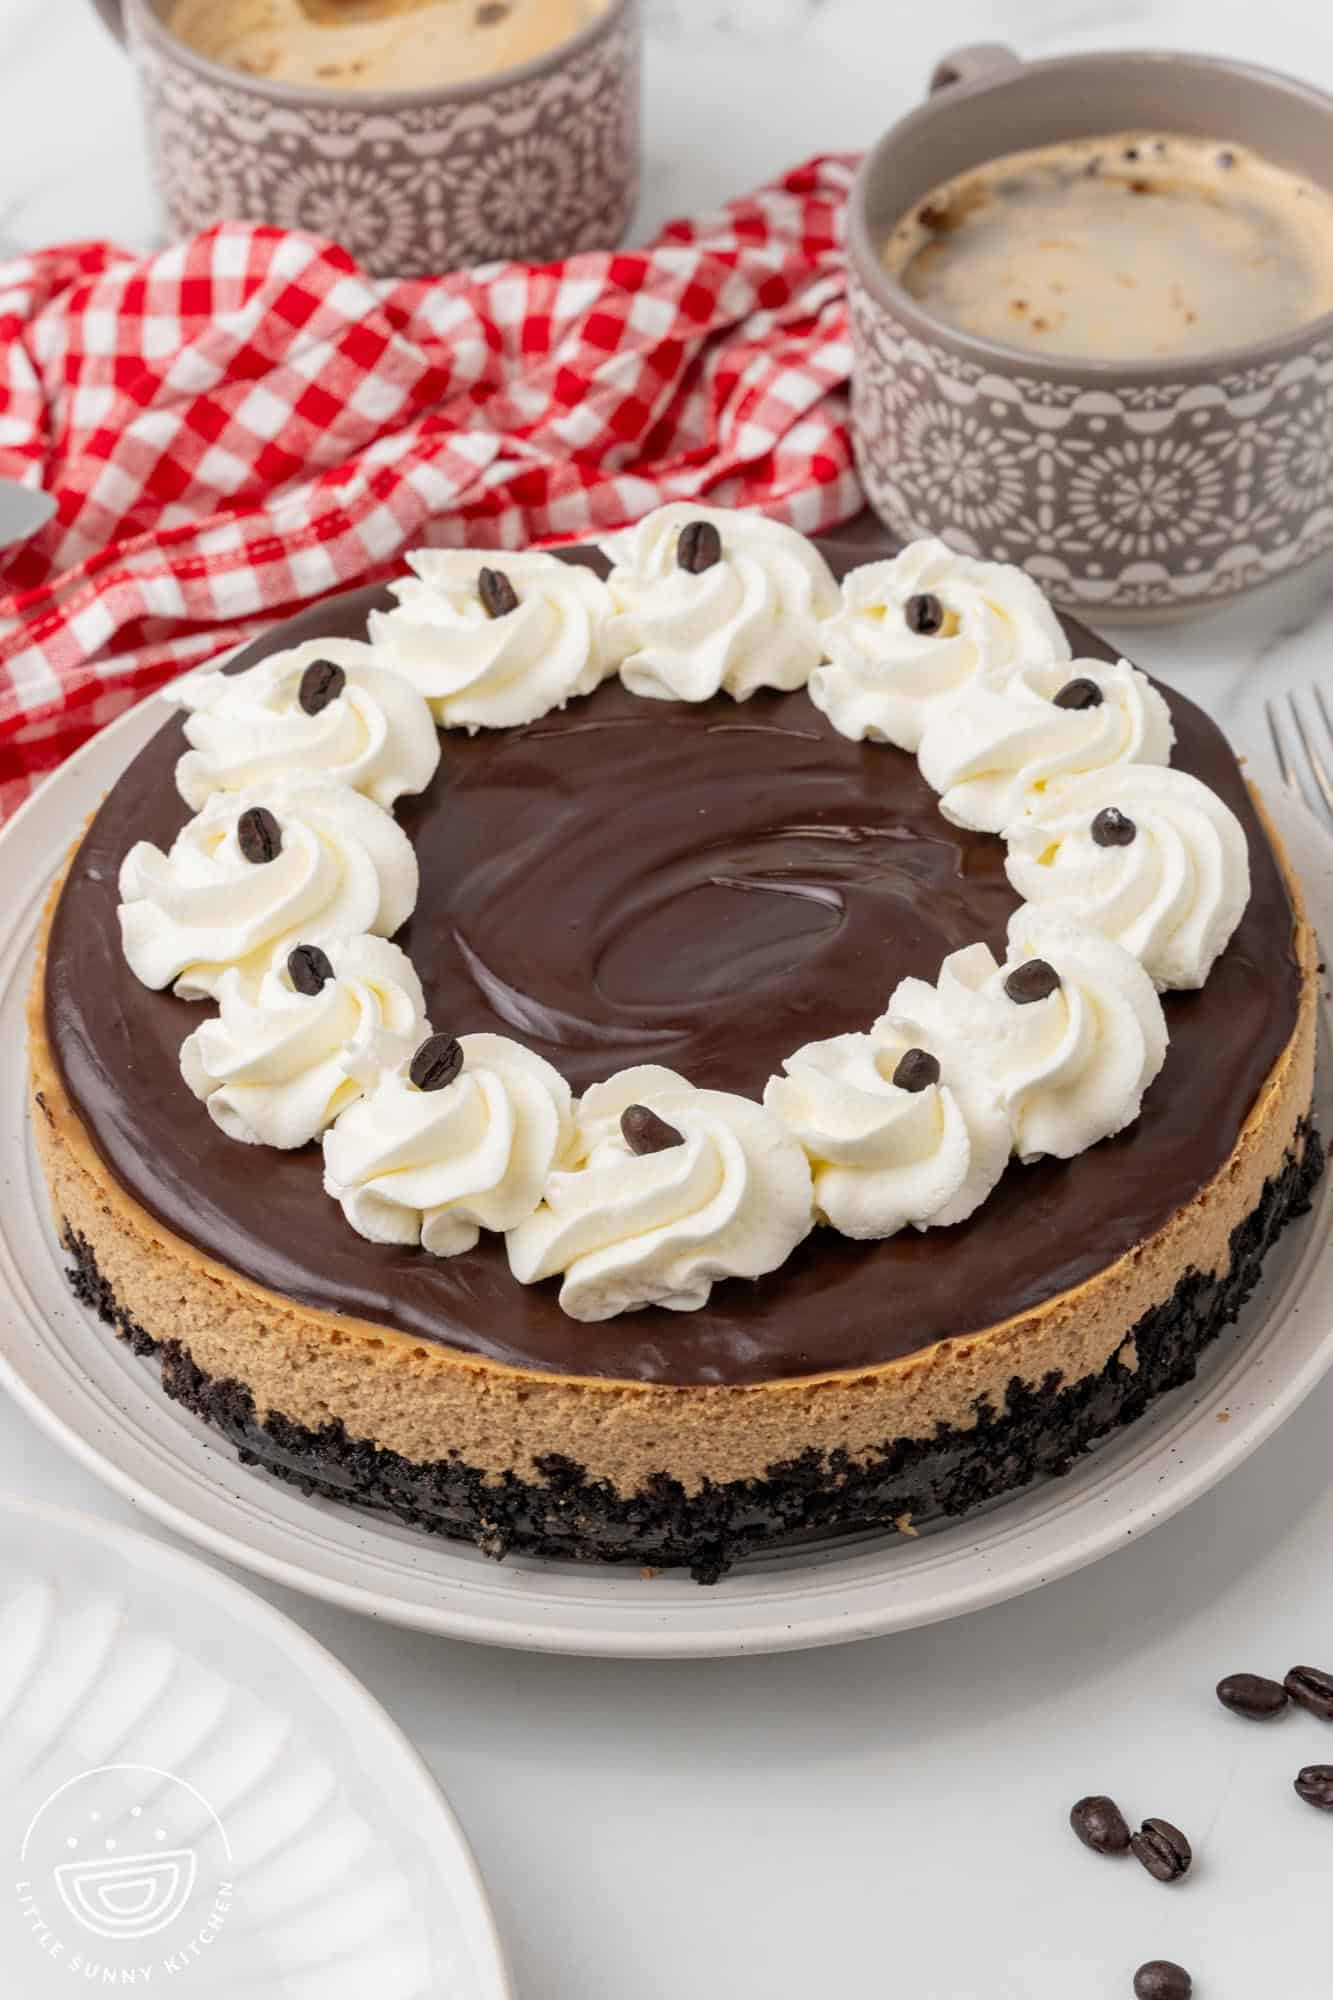
The thick layer of dark chocolate ganache and the buttery Oreo cookie crust make this coffee cheesecake so elegant and decadent, and it is the perfect sweet pick-me-up after a heavy dinner.
So, coffee lovers, I know you’re going to love this recipe! It pairs beautifully with a hot cappuccino or a shot of espresso.
Ingredients In Coffee Cheesecake
Here is everything you’ll need to make the best espresso-infused baked cheesecake:

Complete list of ingredients and amounts can be found in the recipe card below.
For the Oreo Crust
- Oreos: Regular Oreos work best for making a cheesecake crust, as double stuffed ones have a bit too much cream in them. Use your food processor to crush the cookies into small pieces.
- Butter: Unsalted butter helps to bind the cookie crumbs together into a firm crust layer for the cheesecake. You can also use melted shortening if you prefer.
For the Coffee Cheesecake Filling
- Cream Cheese: Four blocks of regular full-fat cream cheese make up the base of the filling. Allow them to sit out on the counter until they are at room temperature.
- Sugar: Granulated sugar adds the right amount of sweetness to offset the rich, bitter flavor of the coffee.
- Espresso Powder: Look for instant espresso powder, often a key ingredient in Tiramisu. If you can’t find it, regular instant coffee granules will work as well.
- Vanilla Extract: Pure vanilla extract enhances the coffee flavor!
- Eggs: Eggs provide structure to the cheesecake as it bakes.
- Sour Cream and Heavy Cream: Together these thin the cream cheese mixture down just enough to make it creamy and pourable.
For the Ganache and Toppings
- Semi-Sweet Chocolate: Rather than semi-sweet chocolate chips, pick up a bar of chocolate, and chop it yourself into small chunks.
- Heavy Cream: Mixes with the chopped chocolate to make a wonderfully simple chocolate ganache topping.
- Optional Toppings: To decorate the top of the cheesecake, try fresh whipped cream and whole roasted coffee beans!
How To Make Coffee Cheesecake

1: Crush Oreos: Use your food processor to chop the cookies into fine crumbs. Then add the melted butter.

2: Press the cookie crumb mixture into the bottom and sides of a spring form pan. Optionally, bake the crust for 10 minutes. Then allow it to cool completely.

3: Mix: Beat the cream cheese with sugar and espresso powder in a stand mixer on high speed until creamy.

4: Finish the Filling by first mixing in the eggs, then the vanilla extract, and finally the cream and sour cream.

5: Pour the cheesecake filling over the Oreo crust. Wrap the pan with foil and place it in a large roasting pan with about an inch of boiling water.

6: Bake for an hour, until set. Cool gradually and then chill in the fridge for at least 4 hours.

7: Make the Ganache: Combine chopped chocolate with steaming hot heavy cream. Let sit for 5 minutes.

8: Stir the ganache until smooth.

9: Pour the ganache over the chilled cheesecake and smooth the top with an offset spatula. Garnish with whipped cream and coffee beans if you like.
Tip!
Grated dark chocolate or white chocolate would also make a pretty garnish on top of your coffee cheesecake!
Tips for the best baked cheesecake
- Making the crust: Be sure to really press down on the Oreo crumb and butter mixture to create a firm, even crust. A flat-bottomed measuring cup or drinking glass can make this process easier.
- Pre-baking the Oreo crust is a key step to take if you like your cheesecake crust to be extra crispy. If you don’t have the time, you can skip this step. After baking the crust for 10 minutes, allow it to cool down completely before adding the filling.
- Mixing the filling: For a super smooth cheesecake, use room temperature ingredients, and ensure that everything is mixed really well. Stop and scrape down the sides of the bowl as you go.
- Water bath: Yes, you definitely need to use a water bath to bake a cheesecake! The water bath turns your oven, which is generally dry, into a moist environment, which will keep the cheesecake from drying out.
- To avoid a cracked cheesecake, allow it to cool down gradually when it’s done baking. First, let it sit in the turned off oven until it comes to room temperature. Then place it in the fridge to cool completely.
Cheesecake Storing Tips
Keep your coffee cheesecake wrapped and in the refrigerator for up to 5 days!
If you plan to add whipped cream to the top, I suggest waiting to do that until right before you will be serving it.
Cheesecakes also freeze very well! Individual slices can be wrapped in plastic wrap and then placed in a freezer bag or container. Allow pieces to thaw overnight before enjoying.

Recipe FAQs
How do I make a water bath for cheesecake?
I find that the easiest way is to place the cheesecake (with the bottom of the pan wrapped in foil) into a large roasting pan. Place the roasting pan in the oven, then pour boiling water around the cheesecake, filling the roasting pan about half way.
If you don’t have a large roasting pan, place any other baking pan on the oven rack underneath the cheesecake, and fill that pan halfway with water. It will have the same moisturizing effect!
Can I make coffee cheesecake with low-fat cream cheese?
I don’t usually recommend baking with low-fat dairy products, especially when you’re trying to make a rich, decadent dessert like this coffee cheesecake recipe. Making cheesecake with full-fat cream cheese, sour cream, and heavy cream will give you the best flavor and texture.
What should I do if my cheesecake cracks?
Cover up any imperfections on the top of your cheesecake with the chocolate ganache!
Are you looking for the best no-bake cheesecake recipes? Try my classic no-bake cheesecake, or my no-bake chocolate cheesecake!
More Decadent Cheesecake Recipes

The perfect dessert for any coffee lover, this espresso cheesecake will make the most amazing finish for your next dinner party or family meal. Pin the recipe to save it for later if you need to!
Did you make this? Be sure to leave a review below and tag me on Facebook, Instagram, or Pinterest!

Baked Coffee Cheesecake
Equipment
- 9 inch springform pan approx 23 cm
- Electric Hand mixer or Stand mixer
- Heatproof bowl
Ingredients
Crust:
- 24 regular Oreo cookies with filling one 9.5 ounce (270g) package
- 4 tablespoons (56 g) unsalted butter melted
Cheesecake:
- 32 ounces (900 g) cream cheese softened to room temperature
- 1 ¼ cups (250 g) granulated sugar
- 2 tablespoons espresso powder
- 1 teaspoon pure vanilla extract
- 4 large eggs room temperature
- ¼ cup (60 ml) sour cream room temperature
- ¼ cup (60 ml) heavy cream room temperature, double cream in the UK
Ganache:
- 6 ounces (170 g) semi-sweet chocolate chopped
- ¾ cup (180 ml) heavy cream double cream in the UK
Garnish (Optional):
- Whipped cream
- Whole coffee beans
Instructions
Make the Crust:
- Preheat the oven to 325°F (160°C) or 140°C for a fan oven.
- In a food processor, crush the Oreos (with filling) into fine crumbs. Add melted butter and pulse to combine.
- Firmly press the mixture into the bottom and halfway up the sides of a 9-inch (23 cm) springform pan.
- Bake for 10-12 minutes, or until dry. Cool completely on a wire rack.
Prepare the Cheesecake:
- In a stand mixer fitted with a paddle attachment, beat cream cheese, sugar, and espresso powder on high speed until smooth and creamy.
- Add the vanilla extract and eggs, one at a time, mixing on low speed after each addition until just combined. Do not overmix.
- Add the sour cream and heavy cream, mixing until smooth.
- Pour the batter into the prepared crust.
- Wrap the outside of the springform pan with two large sheets of foil, ensuring no water can seep in.
- Place the pan in a large roasting pan and carefully pour boiling water into the roasting pan until it reaches halfway up the side of the springform pan.
- Bake for 50-60 minutes, or until the center is slightly wobbly but the edges are set.
- Turn off the oven and slightly crack the door open. Let the cheesecake cool inside for 1 hour.
- Remove the cheesecake from the oven and water bath, then cool to room temperature.
- Refrigerate for at least 4 hours or overnight.
Make the Ganache:
- Chop the chocolate and place it in a heatproof bowl.
- Heat the heavy cream in the microwave in 30-second increments until steaming but not boiling.
- Pour the hot cream over the chocolate and let sit for 5 minutes. Stir until smooth.
- Pour ganache over the chilled cheesecake and smooth with an offset spatula. Refrigerate for 10 minutes to set.
- Garnish with whipped cream and coffee beans, if desired.
Notes:
- Making the crust: Be sure to really press down on the Oreo crumb and butter mixture to create a firm, even crust. A flat-bottomed measuring cup or drinking glass can make this process easier.
- Pre-baking the Oreo crust is a key step to take if you like your cheesecake crust to be extra crispy. If you don’t have the time, you can skip this step. After baking the crust for 10 minutes, allow it to cool down completely before adding the filling.
- Mixing the filling: For a super smooth cheesecake, use room temperature ingredients, and ensure that everything is mixed really well. Stop and scrape down the sides of the bowl as you go.
- Water bath: Yes, you definitely need to use a water bath to bake a cheesecake! The water bath turns your oven, which is generally dry, into a moist environment, which will keep the cheesecake from drying out.
- To avoid a cracked cheesecake, allow it to cool down gradually when it’s done baking. First, let it sit in the turned off oven until it comes to room temperature. Then place it in the fridge to cool completely.
Nutrition Information
This website provides approximate nutrition information for convenience and as a courtesy only. Nutrition data is gathered primarily from the USDA Food Composition Database, whenever available, or otherwise other online calculators.
© Little Sunny Kitchen


Diana Henry says
This is one of the best looking cheesecakes I have ever seen…will definitely be making this one Thank you for posting
Diana says
That’s such a kind compliment, Diana, thank you! I hope you enjoy it as much as we do. Let me know how it turns out!